This blog is a technical note for the installation of slurm on Ubuntu 22.04.
First, I would like to claim that there are already lots of good turtorials online. However, when I try to install slurm, I found most of these turtorials are not working very well due to the changes of the system and tools. The purpose of this note is to record my experience and provide a detailed guide for the installation of slurm 23.11.1 on Ubuntu 22.04. (The reason I did not use ubuntu 24.04 is that I found the change is very huge between 22 and 24, harder to follow the tutorial.)
Here are some main tutorials I followed (they are in Chinese):
Some other tools:
Install the system (ubuntu 22.04).
Install the tools:
MaridDB: slurm need to use maridDB to store the job information.
NFS: network file system, to share the data between the nodes, this allow me to use the same /storage, /opt and /home directory on all the nodes.
NIS: network information service, to manage the user and group information on all the nodes. With NIS, I can create a user on master node, and then use the same user on other nodes.
Install munge: munge is used to secure the communication between the nodes.
Install and set up slurm
It is easy to install the system, just follow the instruction on the ubuntu website. Also remember to install the openssh-server on all the nodes.
If you have a GPU, you can also install the nvidia-driver-* on all the nodes (I use nvidia-driver-550).
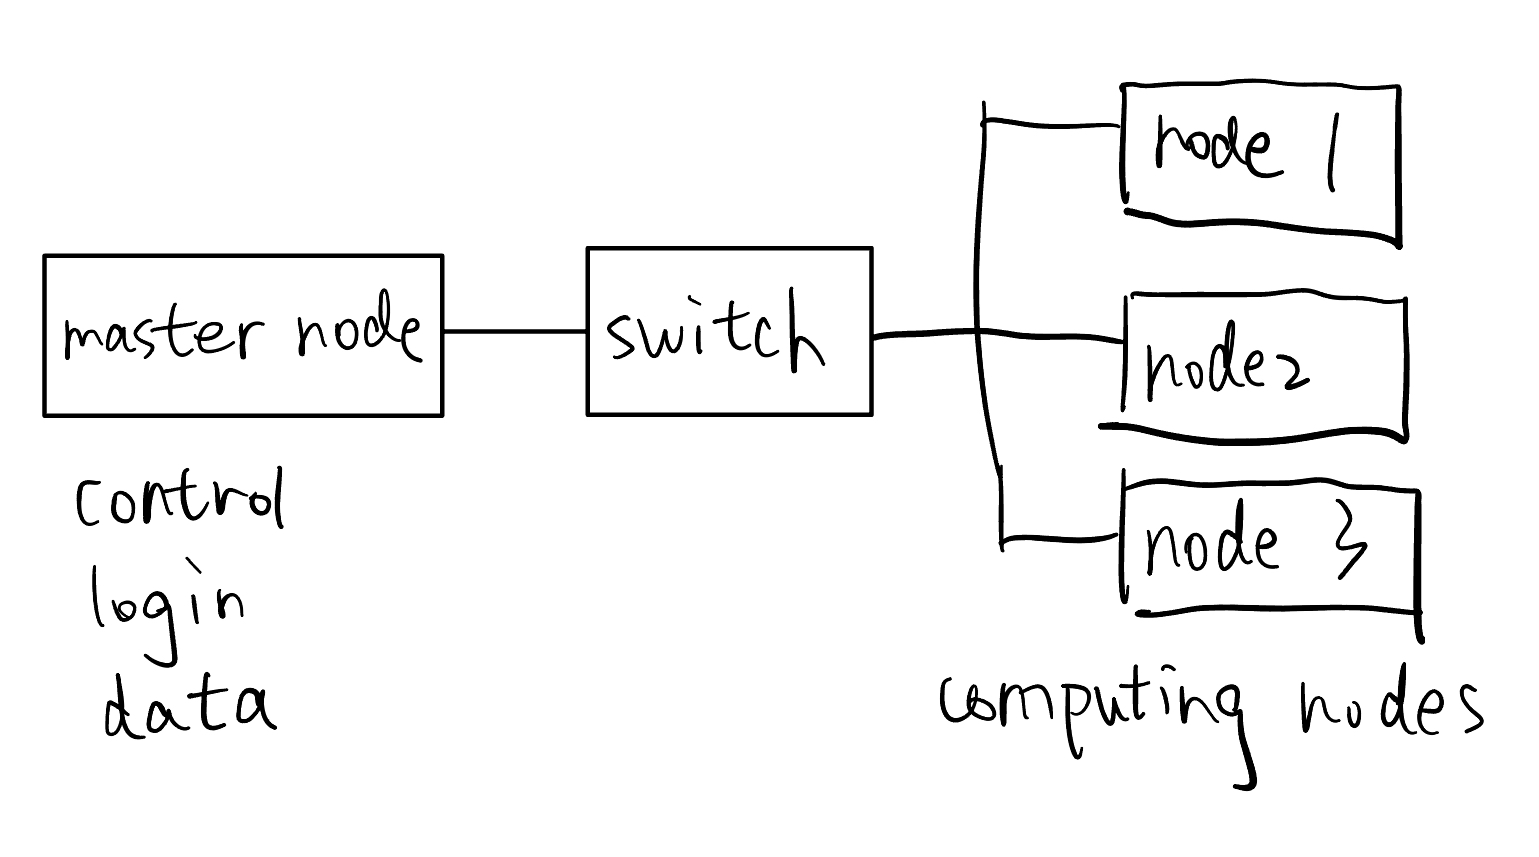
For network, the master node is connected to the internet, and all nodes are connected to the master node (it has two network cards) with a switch to construct a same subnet.
All the following steps should be done by the root user.
Prepare the environment on all the nodes, make sure all is set up correctly before installing munge and slurm.
Just follow the MaridDB tutorial.
Follow this guide to install the NFS. Remember to change the subnet to your own subnet. I directly closed the ufw service on all the nodes (not recommand). I shared /storage, /opt and /home directory on all the nodes.
You can also start the service automatically when the node is booted by make this as a systemd service (in my case, I make it sleep for 10 seconds after the node is booted to make sure the network is ready).
Install the NIS according to the NIS tutorial. One can also use OpenLDAP to replace NIS, but I think NIS is easier to use.
Then run the following command on the master node to create a user.
adduser slurm
adduser munge
and update the NIS database.
cd /etc/yp
make
remember each time you change the user, you need to update the NIS database.
Follows 4.4 of this guide, just remember that create the munge user and group before installing munge!
Follows chapter 3 and 4 of this guide, also you need to create the slurm user and group before doing so.
A mistake in the tutorial is that in the cgroup.conf file should be modified as:
CgroupMountpoint=/sys/fs/cgroup
ConstrainCores=yes
ConstrainDevices=yes
ConstrainRAMSpace=yes
others should be the same as the tutorial.
After the installation, you can enjoy the slurm if you successfully run the following commands.
$ sinfo
PARTITION AVAIL TIMELIMIT NODES STATE NODELIST
i96c256g* up infinite 3 idle node[1-3]
$ srun -N3 hostname
node1
node2
node3
Here is an example of the slurm script, where I run a julia script on 1 node with 96 cores, 192 threads.
$ cat blas.jl
using BLASBenchmarksCPU, CSV, DataFrames
libs = [:Gaius, :Octavian, :OpenBLAS]
threaded = true
benchmark_result = runbench(Float64; libs, threaded)
df = benchmark_result_df(benchmark_result)
CSV.write("/home/xzgao/work/julia_test/blas_results.csv", df)
$ cat run.slurm
julia --project=/home/xzgao/work/julia_test -t 192 /home/xzgao/work/julia_test/blas.jl
$ sbatch run.slurm
Submitted batch job 26
$ squeue
JOBID PARTITION NAME USER ST TIME NODES NODELIST(REASON)
26 i96c256g test xzgao R 0:01 1 node1
$ sinfo
PARTITION AVAIL TIMELIMIT NODES STATE NODELIST
i96c256g* up infinite 1 alloc node1
i96c256g* up infinite 2 idle node[2-3]
Since I use NFS to share /home directory, the program can be run on any nodes once the user install software under the /home directory.